
伪类选择器包括伪类和伪对象选择器,以符号
:作为前缀标识符。冒号前可以添加选择符,以限定伪类应用的范围,冒号后为伪类和伪对象名,冒号前后无空格,否则会当做类选择器。
如:a:hover{font-size:18px}
a为施加样式的对象,hover为伪选择器的名称,二者通过:冒号链接。
了解了格式后,那么什么是伪类呢? > CSS伪类是用来添加一些选择器的特殊效果。
解释:在感觉上伪类可以是动态的,当用户和文档进行交互的时候一个元素可以获取或者失去一个伪类。例外的是":first-child"能通过文档树推断出来,":lang"在一些情况下也在从文档树中推断出来。
由此可以看出,它的功能和class有些类似,但它是基于文档之外的抽象,所以叫伪类
常见伪类: 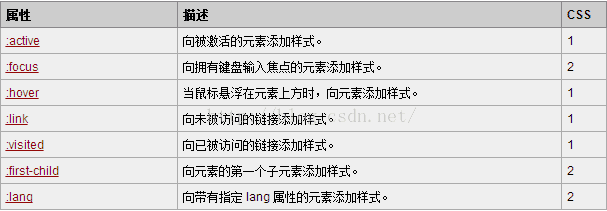
用法:CSS伪类有两种用法:单纯式和混用式
1. 单纯式: E:pseudo-class{property:value}
E为元素,pseudo-class为伪类名称,property是CSS属性,value是CSS属性值。
如:a:link {color:red;}
设置了a标签内的链接样式,在未被访问时为红色。 2.
混用式:E.class:pseudo-class{property:value}
.class表示类选择符,将类选择器与伪类选择器复合起来,来更精确地匹配元素。
如:a.selected:hover{background-color:blue;}
设置了当a标签内class为selected的链接,当将鼠标放上去时,颜色会变为黄色。
CSS3的伪类选择器主要包括4种:动态伪类、结构伪类、否定伪类、状态伪类。
动态伪类
动态伪类是一系列行为类样式,这些伪类不存在于HTML中,只有当用户与页面进行交互时才能体现出来。动态伪类选择器主要包括两种形式:
1. 锚点伪类:这是一种常见的链接伪类。常见的有:link, :visit。 2.
行为伪类:也称为用户操作伪类,如:hover、 :active和:focus.
如锚点伪类的使用: 1
2
3
4
5
6
7
8/*链接没有被访问时前景色为红色*/
a.demo:link{color:red;}
/*链接被访问过后前景色为黄色*/
a.demo:visited{color:yellow;}
/*鼠标悬浮在链接上前背景色为黑色*/
a.demo:hover{color:black;}
/*鼠标击中激活链接的一瞬间前景色为蓝色*/
a.demo:active{color:blue;}
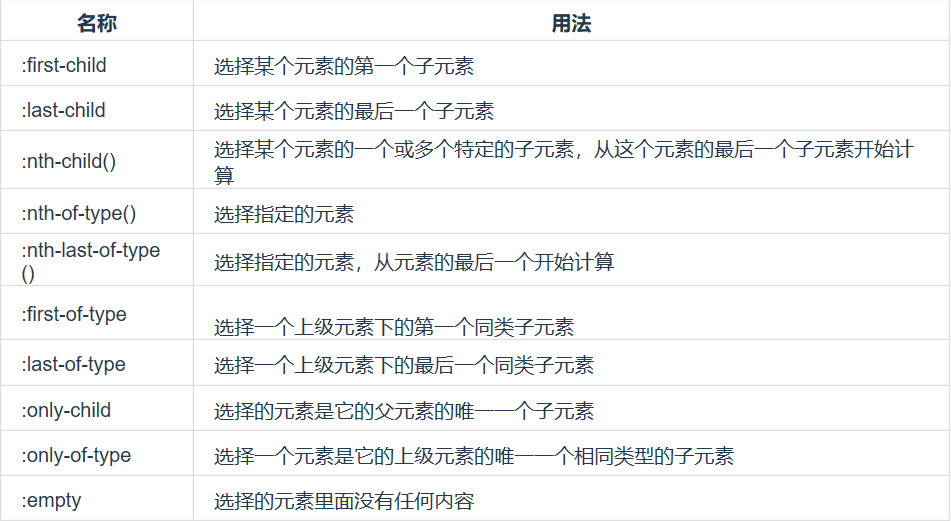
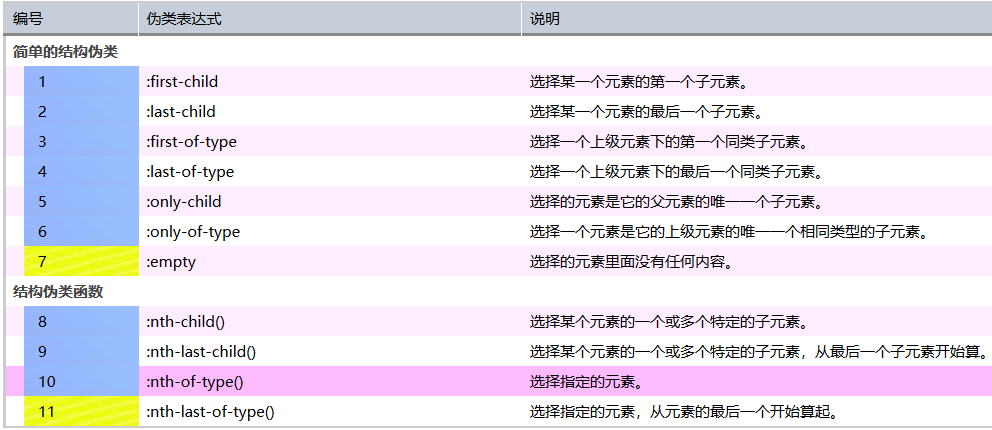
结构伪类
结构伪类是CSS3新设计的选择器,他利用文档结构树实现元素过滤。通过文档结构的相互关系来匹配特定元素,从而减少文档内class属性和ID属性的定义,使得文档更简洁。
结构伪类有很多形式,这些形式的用法是固定的,但可以灵活运用。
否定伪类
:not()表示否定选择器,即排除或者过滤掉特定元素。前面介绍的选择器都是做匹配操作,唯独:not()操作相反,它表示过滤操作,与jQuery中的:not选择器用法相同。
如:在表单设计中,要为form中所有input元素增加边框样式,但又不希望提交按钮也增加边框,就恶意可以使用:not()选择器实现。
input :not([type="submit"]) {border: 1px soild red;}
:not()可以帮助用来定位不匹配该选择器的元素,实现匹配操作后的二次过滤。
下面我们利用上面提到一些选择器、动态伪类、结构伪类和否定伪类来设计一个分层表格样式:
1
2
3
4
5
6
7
8
9
10
11
12
13
14
15
16
17
18
19
20
21
22
23
24
25
26
27
28
29
30
31
32
33
34
35
36
37
38
39
40
41
42
43
44
45
46
47
48
49
50
51
52
53
54
55
56
57
58
<html xmlns="http://www.w3.org/1999/xhtml">
<head>
<meta http-equiv="Content-Type" content="text/html; charset=utf-8" />
<title>分层表格</title>
<style type="text/css">
table { border-collapse: collapse; font-size: 75%; line-height: 1.4; border: solid 2px #ccc; width: 100%; }
th, td { padding: .3em .5em; cursor: pointer; }
th { font-weight:normal; text-align: left; padding-left: 15px; }
td:only-of-type { /*使用结构伪类选择器匹配合并单元格所在行,定义合并单元格所在行加粗显示*/
font-weight:bold;
color:#444;}
tbody th:not(.end) { /*使用否定伪类选择器来匹配除了非最后一个的th元素。以背景方式在行前定义结构路径线*/
background: url(蓝色.jpg) 15px 56% no-repeat;
padding-left: 26px;}
tbody th.end { /*使用类选择器来定义end类的样式.以背景方式在行前定义结构封闭路径线*/
background: url(黄色.jpg) 15px 56% no-repeat;
padding-left: 26px;}
thead th { /*使用thead元素将表头标题独立出来,方便控制,避免定义过多的class属性*/
background: #c6ceda;
border-color: #fff #fff #888 #fff;
border-style: solid;
border-width: 1px 1px 2px 1px;
padding-left: .5em;}
tbody tr:nth-child(2n) {background-color: #fef;}
tbody tr:hover{background: #fbf;}
/*使用:nth-child()选择器设计了隔行换色的样式,并使用:hover动态伪类设计鼠标经过时行背景色的变换*/
</style>
</head>
<body>
<table>
<thead>
<tr>
<th width="27">编号</th>
<th width="121">伪类表达式</th>
<th width="469">说明</th>
</tr>
</thead>
<tbody>
<tr><td colspan="3">简单的结构伪类</td></tr>
<tr><th>1</th><td>:first-child</td><td>选择某一个元素的第一个子元素。</td></tr>
<tr><th>2</th><td>:last-child</td><td>选择某一个元素的最后一个子元素。</td></tr>
<tr><th>3</th><td>:first-of-type</td><td>选择一个上级元素下的第一个同类子元素。</td></tr>
<tr><th>4</th><td>:last-of-type</td><td>选择一个上级元素下的最后一个同类子元素。</td></tr>
<tr><th>5</th><td>:only-child</td><td>选择的元素是它的父元素的唯一一个子元素。</td></tr>
<tr><th>6</th><td>:only-of-type</td><td>选择一个元素是它的上级元素的唯一一个相同类型的子元素。</td></tr>
<tr><th class="end">7</th><td>:empty</td><td>选择的元素里面没有任何内容。</td></tr>
<tr><td colspan="3">结构伪类函数</td></tr>
<tr><th>8</th><td>:nth-child()</td><td>选择某个元素的一个或多个特定的子元素。</td></tr>
<tr><th>9</th><td>:nth-last-child()</td><td>选择某个元素的一个或多个特定的子元素,从最后一个子元素开始算。</td></tr>
<tr><th>10</th><td>:nth-of-type()</td><td>选择指定的元素。</td></tr>
<tr><th class="end">11</th><td>:nth-last-of-type()</td><td>选择指定的元素,从元素的最后一个开始算起。</td></tr>
</tbody>
</table>
</body>
</html>
状态伪类
状态伪类主要是针对表单设计的,而表单则是UI(User Interface)的灵魂。
UI元素的状态一般包括:可用、不可用、选中、未选中、获取焦点、失去焦点、锁定、待机等。
CSS3定义了3种新的UI状态伪类选择器。 1.
:enabled:匹配指定范围内所有可用的UI元素。在网页中,UI元素一般指包含在form元素内的表单元素,如input:enabled选择器将匹配文本框,但不匹配表单中的按钮。
1
2
3
4<form>
<input type="text" />
<input type="button" />
</form>1
2
3
4<form>
<input type="text" />
<input type="button" disabled="disabled" />
</form>1
2
3
4<form>
<input type="checkbox" />
<input type="radio" checked="checked" />
</form>
以上的状态伪类是比较常用的,最常见的type="text"有enabled和disabled两种状态,前者为可写状态后者为不可写状态。type="radio"和type="checkbox"(一个是原点样子一个是方框样子)也有两种状态,checked和unchecked。
例:我们做一个简单的登陆表单:
1 |
|
效果图: 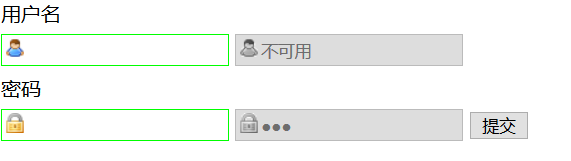
目标伪类
目标伪类选择器格式
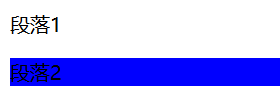
E:target,表示匹配E的所有元素,且被相关URL指向,注意:只有存在URL指向该匹配元素时才有效。
例:当在URL后附加"#1"或"#2"时,将以锚点方式链接到id为"1"或为"2"的并立即显示蓝色。
1
2
3
4
5
6
7
8
9
10
11
12
13
14
15
<html xmlns="http://www.w3.org/1999/xhtml">
<head>
<meta http-equiv="Content-Type" content="text/html; charset=utf-8" />
<title>无标题文档</title>
<style type="text/css">
p:target { background:blue; }
</style>
</head>
<body>
<p id="1">段落1</p>
<p id="2">段落2</p>
</body>
</html>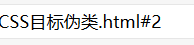
emmmmmmm到这里选择器部分就告一段落了,内容还是比较多的,建议多写多练,这部分内容还是很重要的。练习平台
CSS基础部分到此结束,一些很基础的标签内容这里不会提及,更详细的一些标签用法建议去W3cschool多看多练。